All done. Sealed him tonight.
Showing posts with label Harkevich. Show all posts
Thursday, April 19, 2012
Monday, April 16, 2012
Project Log: Kommander Harkevich the Iron Wolf, Part VII
I hate faces!!
I really hate faces!!
Faces suck balls to paint!!
Almost done with this guy. Painting up the base and mounting him this
week, then doing some final touch ups and calling him finished.
Sunday, April 8, 2012
Project Log: Kommander Harkevich the Iron Wolf, Part VI
So I have been utterly horrible with updates this last
week. Sorry. Had a rather odd schedule at work and not a
lot of time left for painting, toss in a holiday, some other random events and
all of a sudden…a whole week has gone by without really touching a model or
paintbrush. I have done some work on
Harkevich. I started in on the metal
piping and the boiler. I also received my
order for the Vallejo Game Color line.
72 new paints to work with!!! I
have had a limited exposure to Vallejo paints, so little in fact that I
consider myself to be learning how these paints flow from the brush…so far, I
am really impressed.
Quick rundown on colors; Metal starts out with Tin Bitz
(GW) and then gets a wet-brush/dry-brush coat of Boltgun Metal depending on the
size of the area and how early I am in the process of painting the model and
then touched up/highlighted by a slight hint of Chainmail (GW). If I am going on to gold or bronze then I
will just add a layer on top of the boltgun and use a mixture of Shining Silver
and gold for the last highlights. Well…Tin
Bitz Layer, Check! Boltgun Layer…replaced
with an over-brush layer of Gunmetal Metal (Val), Check! Bronze Layer is an
over-brush of Bright Bronze (Val) and highlight layer of Gunmetal Metal mixed
with Bright Bronze. I need to go in and
wash the bronze with a 50/50 mix of Gryphonne Sepia and Water to add a final
layer.
I also finished up the blanket (positioned on top of a
hot boiler…) by first starting with a layer of Fenris Grey (GW) and then washed
with Delvan Mud (<-----Man I love this stuff). A second layer made up of a mix of Fenris
Grey/Adeptus Battlegrey. Final
highlights are just done with Adeptus Battlegrey on the ridges of the cloth
blanket.
Anyway, sorry for the lack of updates and the shortness
of this update but I should be able to put more paint to model this week and I
will be posting regular updates with my progress, and since we are almost half
way through April, I don’t have much time left to finish up the model. Oh and I still need to work on the base…
I also touched up the armor spikes and bands around the armor as well. Still a bit more work to be done on this guy and I'll be damned if I let something as stupid as my broken back get in the way of me paintinga minimum of two hours a night.
Fun times!
Wednesday, March 28, 2012
Project Log: Kommander Harkevich the Iron Wolf, Part V
Just a quick update.
I wanted to show the work I have done on the armor. First picture is of the armor after a light
wash of Devlan Mud. As you can see it
really darkened up the armor.
The second picture sees another layer of Red Gore, paying
special attention to leave the recessed areas dark. I know it doesn’t look like much changed but
the shine from the wash is dulled down and the red is revived just a bit.
Third picture shows the black that I added to the armor
to break up the monotony of the red and the black around the knee caps and elbows
will eventually get a coat of gold on it.
I need to go in and do the spikes, screw heads, and
rivets next.
Tuesday, March 27, 2012
Project Log: Kommander Harkevich the Iron Wolf, Part IV
I finished up with Harkevich’s cloak. Why I focused on that versus say the armor,
is beyond me, I just started painting the cloak up and wanted to finish it. When I first saw the model I didn’t really
pay attention to all the little things on the over-coat like the canteen, the
two pouches, and the map/scroll case.
Pretty neat stuff and the more I was looking at those
little items the more I really began to like the aesthetic that Privateer Press
has given to the Khador miltary. I
served in the USAF and while I was deployed to Saudi Arabia I remember all the
little bits and pieces that had to go onto my uniform. Gas Masks, multi-tools, ammo pouches, flashlight,
radio, canteen, you name it and it had a spot on my gear. When I
would put on my uniform I had to make sure that everything was in its
appropriate place and I am seeing that attention given to the Khador models and
it calls to that military part of my soul.
Moving on, to finish out the cloak, I finished up the
metal plates first. I went in and
touched up the plates with Boltgun Metal after the Gryphonne Sepia layer. I tried to leave that nice little ‘sepia’
colored ring around the studs to help add depth to the plates. Since I didn’t have Mithril Silver (GW) any
more, I went with Honed Silver (Reaper) and along the top edges of the plates
just added a nice little line. It is
very hard to notice unless you are up close and personal with Harkevich.
The next item to tackle was the bags, canteen, and scroll
case. The bags I used Bestial Brown (GW)
and then hit up with a heavy Gryphonne Sepia wash, followed by another layer of
Bestial Brown and a final highlight of a Bestial Brown/Bleached Bone mix. For the Scroll case, I figured a good ol’fashioned
metal case would work, so I hit it with an over-brush of Boltgun and painted the
straps with Vermin Brown (GW). The
canteen case saw me go back to Graveyard Earth (GW) and Gryphonne Sepia Wash,
which I used for some of the leathers on Harkeviches boots. Now the cloak is pretty much as done as it
gets…for the moment. Once I get in some
work on the Armor I will come back through and do some final highlighting and
lining.
I also worked on the boiler a little bit. First thing I did, was put some Blood Red (GW) in the boiler, where the fires would be, then I went in and instead of going the entire length of the vent, I went half way down with Blazing Orange (GW) and then did the same thing, a quarter of the way down with Golden Yellow (GW) to give the nice fire-like effect. No crazy cool blending but nice and simple to convey what I want. I need to add in the bronzed areas to the boiler and the piping but again I am going to wait until I get closer to finishing the armor plates.
For the Armor plates I went straight to Red Gore (GW). A nice deep red, that doesn’t have the purple
tint to it like the Scab Red has. When
it is layered on top of the white primer and red pre-wash man does it stand
out! I ended up doing 3 or 4 thin layers
of the Red Gore to get the even coat and I am debating on washing it to add
some extra shading to the recessed areas…hell I am not even debating it, I am
going to do it, just need to decide on if I am going to use a Baal Red Wash or
Gryphonne Sepia (did I mention that I used the Sepia wash a lot??) Once I get that wash down, I will put down
another layer of the Red Gore, staying away from the shadowed areas, and then
add in some final highlights along the raised portions.
Until next Project Log update, keeping painting and best
of luck in any of the games you might play!
Saturday, March 24, 2012
Project Log: Kommander Harkevich the Iron Wolf, Part III
This week was busier than expected so I wasn’t able to
paint as much as I wanted to. I ended up
closing 3 nights this week and on the nights I was off they were jam packed
with other things. Well I did get in a
50pt game versus Wes down at Matrix Games…so I suppose I could have painted a
bit more.
I figured I would continue along on Harkevich’s
over-coat. I put down a layer of
Scorched Brown (GW) on the fur portions of the over-coat and behind Harkevich’s
head. I broke out the trusty Tin Bitz
(GW) and put down a solid even layer of on the metal plates of the
over-coat. This is nothing new. I always start most of my metals with a Tin
Bitz coat because when dry brushed over it gives the metal a very nice aged
quality.
Instead of using Boltgun Metal, I used Shadowed Steel
(Reaper). Boltgun has a much darker hue
to it, while the Shadowed Steel has a brighter metallic look to it. Instead of drybrushing on the layer like I usualy
do, I did a few thin layers and got another flat even coat. The Tin Bitz is barely showing through but
that is okay.
Now comes the wash.
Certain Washes are just super versatile.
Delven Mud and Gryphonne Sepia
are the two washes I use the most. In order to dull down the bright
metal I put down a heavy Gryhonne Sepia Wash, which is also great for also
helping to ‘age’ the metal. My next step
after this is going to be adding another layer of the metal and instead of
drybrushing, I am going to add some edge highlights and pick out the studs.
I also did up his boots.
Not really sure why, but I was eyeballing the figure and remembered
something Jody told me, paint from the inside out. So I did, with his boots, which is a pretty
simple scheme that turns out great.
Graveyard Earth (GW), Delvan Mud Wash (GW), touch up with Graveyard
Earth. For the leather straps I just did
a thin layer of Snakebite Leather (GW) and then hit the rivets with Boltgun
Metal.
Sunday, March 18, 2012
Project Log: Kommander Harkevich the Iron Wolf, Part II
Here is the second update to the Project Log. Last night I sat down put on some random show
from the DVR and started painting. I
figured I would get my teeth wet on Harkevich by painting up his
over-coat. Keeping in line with the
official colors, I went for the drab military green that is presented in the
Forces of Warmachine: Khador book. The
steps they give are pretty sweet but seeing as how I don’t have the requisite
P3 paints to do it like they suggest I decided to have that unique ‘Grant’
crack at it. I started with Thornwood
Green (P3) and got a nice even flat coat (No pun intended) using multiple thin
layers.
After I put down the base coat, I washed the coat again
with Delven Mud and then I made a mix of Thornwood Green (P3) and Traitor Green
(P3). I again thinned down the paint a
little bit and then added a second layer of the Thornwood/Traitor Green mix to
lighten up the cloak just a little bit.
Since I was mixing stuff up on a wet palette, I added
another brushful of Traitor Green to the Thornwood/Traitor Mix to lighten up
the cloak even farther. I then dappled
the new mix on the cloak taking care to avoid covering up all of the previous
layers. Up close, it looks pretty shiny
and bright but when the model is on the table it looks like a nice and drab
military green.
I am toying with the idea of adding another layer of
highlights around the edges by mixing up some Traitor Green (P3) and Bleached
Bone (GW) like I used on my Searforge Commision models.
I’ll keep taking pictures as I do the model in the stages
and posting up what I have done.
So until next update, keep on painting!
Friday, March 16, 2012
Project Log: Kommander Harkevich the Iron Wolf, Part I
Scott is at it again with another painting competition,
this time for a Warcaster or Warlock from Warmachine or Hordes line. Again all that is required is that the model
has been purchased from one of the local stores, i.e. Matrix or The Armory. Since most of my models have been purchased
at The Armory, it gave me a few options to pick from: Capt. Jeremiah Kraye, Capt.
Kara Sloan, Adept Sebastian Nemo (2010 Ed.), Durgan Madhammer, Kommander
Harkevich, Constance Blaize, and Forward Kommander Sorcha, to name but a few…
So I was kicking ideas around in my head and at first I
wanted to paint up Capt. Kara Sloan and I took out the model and decided that
here is a model that I really want to paint up well and not screw up on…so I
put her back down and will get back to her.
I know my skill with painting is getting better every time I touch a
brush and I want to be just a little bit better before I start painting her
up. I know it is kind of silly to think
that but I am going to hold off on painting her up for a bit longer.
Capt. Jeremiah Kraye and Kommander Harkevich therefore
stood at the top of my list. So I
debated on which one I wanted to paint up.
Kraye is probably my single most favorite model in the miniature
line. Talk about the sculptor capturing
an emotion…Kraye speaks to me of dogged determination. Tired and weary, trudging along but also
determined to get the job done. Such a
dynamic sculpt! Best in the line I tell
you. I pulled him out, stripped his base
and put down new gravel and was getting ready to primer him up. Harkevich is a pretty great looking
model. Lots of great detail and stance
that is just chalked full of fierce pride.
Which to do, which to do?
While talking with Joel @ Brush Zealot though I changed
my mind and decided to paint up Harkevich.
While looking at his sculpt and his artwork (which are almost
identical…something PP should have done with Kara Sloan, but enough of that) I
started thinking about doing up his base like the artwork and that little
nugget of thought started itching my brain something crazy. Something I haven’t done before is work with
cork or try to do up a base on my own.
Don’t get me wrong, I love Dragon Forge Bases but this one I want to do
all by my lonesome (with advice from friends of course).
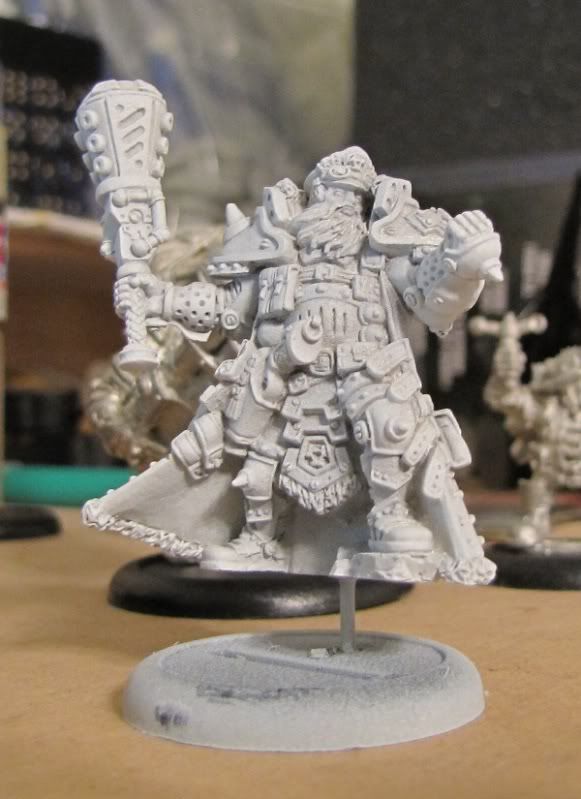
From that point, I pulled Harkevich out of his blister,
which I purchased at The Armory when he released, and got to cleaning and
assembly. I pinned his club arm in place
and then let the glue dry. Next I washed
the model to remove the mold release and let it dry. My next step was to get him on to a base, so
I drilled into his over-coat and using a 1.25mm brass rod I elevated him up and
pinned him to an extra 30mm base that I have.
Again letting the glue dry I then shook up my can of P3 white primer and
got busy making him nice and snowy white.
As I posted a while back, I definitely hate working with
white primer but (yes here is the pre-requisite but) when painting with Reds it
makes it means less work and a brighter over all model. Now that being said, in order to avoid the
stupid ass white spots that will inevitably crop up on a white primer’d model,
I ‘pre-shaded’ the model using the Citadel Washes. Baal Red for the armor plates, Delven Mud for
the Cloak and leather portions, Gryphonne Sepia for the metal piping, boiler,
and weapon, and lastly Ogryn Flesh for his face.
One of the big reasons I like pre-shading my models is
that it allows me to see all the detail of the model without destroying any of
that detail with thick paint. PLUS as an
added bonus it adds the first layer of shading to the model…who knew?!
The next thought to pop into my head was to do make a
Project Log out of this painting competition model so each step of the way I
will be detailing what I have done and taking plenty of pictures to explain it
in detail to all of my loyal readers!
This is one of many entries to come as I work on
Harkevich. Expect painting legends,
step-by-step instructions and how-to’s!
(I know getting a head of myself here…cause we all know I am the most
award winning painter ever, never having won a painting competition in my
life. LOL!!)
Until next entry!!!
Subscribe to:
Posts (Atom)